This article describes the installation of Oracle Database 11g release 2 RAC on Linux using VirtualBox.
Introduction:
For installing 11gR2 RAC in your laptop or desktop computer has minimum 8 GB or more of RAM required, and used oracle virtualBox showed in this article.
This article uses the 64-bit versions of Oracle Linux, and Oracle 11g Release 2 (11.2.0.3). Using VirtualBox you can run multiple Virtual Machines (VMs) on a single server, allowing you to run both RAC nodes on a single machine. Also it allows you to set up shared virtual disks. The finished system includes two guest operating systems, two sets of Oracle Grid Infrastructure (Clusterware + ASM) and two Database instances all on a single server.
Download Software:
Virtual Machine Setup:
Follow below steps to install VirtualBox in your system and create Virtual machine.
Start VirtualBox and click "New" button on the toolbar. Click the "Next" button on the first page of the Virtual Machine Wizard:
Enter the name "rac1", OS "Linux" and Version "Oracle (64 bit)", and then click the "Next" button:
If you have 16 GB of RAM in your host system, then set Base Memory to 3072 MB, otherwise use 2048 MB. Then click the "Next" button:
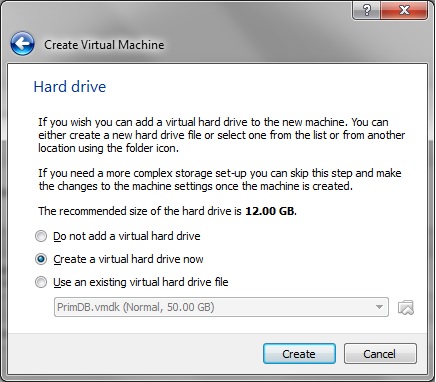
Accept the default option to create a new virtual hard disk by clicking the "Next" button:
Select VMDK type and click the "Next" button on the Create Virtual Hard Drive Wizard welcome screen:
Accept the default "Dynamically allocated" option and check option "Split into files of less than 2GB". Then Click the "Next" button:
Accept the default location and set the size to more than 16G and click the "Next" button:
Press the "Create" button on the Create New Virtual Disk Summary screen.
The "rac1" VM will appear on the left hand pane. Click on the "Network" link on the right side:
Make sure "Adapter 1" and Adapter 1 is enabled, And attach to "Bridged dapter"
Select Processors to minimum 2 CPU
The virtual machine is now configured so we can start the operating system installation.
Operating System Installation:
Follow below steps to install Oracle Enterprise Linux 5.7:
Start the "rac1" Virtual machine
Select OS iso image
The resulting console window will contain the Oracle Linux boot screen. Proceed with the "Install or upgrade in graphical mode":
Do not perform the media test. Choose "Skip" button:
Continue through the Oracle Linux installation as you would for a normal server.
Reboot your guest operation system.
Install Guest Additions
Go to Devices and select Install Guest Additions
Open New Terminal and copy Guest Additions as shown below
Eject the Guest Additions CD
Mount the Linux Software as shown below
Go to Server directory in Linux Software and install the selected package as shown below
Go to Guest Additions software location and install Guest Additions now as follows
Again reboot the guest operating system.
Network Setup:
All actions in this section must be performed by the root user. Edit "/etc/hosts" file by appending the following information.
bash# cat /etc/hosts
127.0.0.1 localhost.localdomain localhost
# Public
192.168.1.101 rac1.oracle.com rac1
192.168.1.109 rac2.oracle.com rac2
# Private
192.168.0.101 rac1-priv.oracle.com rac1-priv
192.168.0.102 rac2-priv.oracle.com rac2-priv
# Virtual
192.168.1.111 rac1-vip.oracle.com rac1-vip
192.168.1.112 rac2-vip.oracle.com rac2-vip
# SCAN
192.168.1.113 rac-scan.oracle.com rac-scan
Setup Network Configuration with using "neat" command as root user. Follow below steps:
bash# neat
Select etho and click on “Edit”, Add entries mentioned in below image. Click “OK” and then select DNS Tab:
Add below entries and then select “Devices” tab.
On "Devices" tab, click “Activate”. Once it is done, select eth1
Select “eth1″ and then select Edit.
Then select “Devices” tab and Click “Activate” and then do the “service network restart”
Oracle Clusterware Installation Prerequisites:
1) Install the following RPMs with using ROOT user:
bash# cd /media/OL5.7\ x86_64\ dvd\ 20110728/Server/
rpm -Uvh binutils-2.*
rpm -Uvh compat-libstdc++-33*
rpm -Uvh elfutils-libelf-0.*
rpm -Uvh elfutils-libelf-devel-*
rpm -Uvh gcc-4.*
rpm -Uvh gcc-c++-4.*
rpm -Uvh glibc-2.*
rpm -Uvh glibc-common-2.*
rpm -Uvh glibc-devel-2.*
rpm -Uvh glibc-headers-2.*
rpm -Uvh ksh-2*
rpm -Uvh libaio-0.*
rpm -Uvh libaio-devel-0.*
rpm -Uvh libgcc-4.*
rpm -Uvh libstdc++-4.*
rpm -Uvh libstdc++-devel-4.*
rpm -Uvh make-3.*
rpm -Uvh sysstat-7.*
rpm -Uvh unixODBC-2.*
rpm -Uvh unixODBC-devel-2.*
rpm -Uvh oracleasm-support-2.1.7-1.el5.x86_64.rpm
rpm -Uvh kernel-debug-2.6.18-274.el5.x86_64.rpm
rpm -Uvh kernel-xen-2.6.18-274.el5.x86_64.rpm
rpm -Uvh oracleasm-2.6.18-274.el5*
2) umount tmpfs
bash# mount -t tmpfs shmfs -o size=3000m /dev/shm
3) Make sure setting permanent by amending the "tmpfs" setting of the "/etc/fstab" file
4) Add below lines to the "/etc/sysctl.conf" file.
fs.aio-max-nr = 1048576
fs.file-max = 6815744
kernel.shmall = 2097152
kernel.shmmax = 1054504960
kernel.shmmni = 4096
# semaphores: semmsl, semmns, semopm, semmni
kernel.sem = 250 32000 100 128
net.ipv4.ip_local_port_range = 9000 65500
net.core.rmem_default=262144
net.core.rmem_max=4194304
net.core.wmem_default=262144
net.core.wmem_max=1048586
Run below command to change current kernel parameters.
bash# /sbin/sysctl –p
5) Add the following lines to "/etc/security/limits.conf" file
oracle soft nproc 2047
oracle hard nproc 16384
oracle soft nofile 1024
oracle hard nofile 65536
6) Add the following lines to the “/etc/pam.d/login” file, if it does not already exist.
session required pam_limits.so
7) Disable secure linux by editing the “/etc/selinux/config” file, making sure the SELINUX flag is set as follows.
SELINUX=disabled
8) Create the new groups and users.
bash# groupadd -g 1000 oinstall
bash# groupadd -g 1200 dba
bash# useradd -u 1100 -g oinstall -G dba oracle
bash# passwd oracle
9) Create the directory in which the Oracle software will be installed.
bash# mkdir -p /u01/app/11.2.0/grid
bash# mkdir -p /u01/app/oracle/product/11.2.0/db_1
bash# chown -R oracle:oinstall /u01
bash# chmod -R 775 /u01/
10) Deconfigure NTP, the Oracle Cluster Time Synchronization Service (ctssd) can synchronize the times of the RAC nodes.
bash# service ntpd stop
Shutting down ntpd: [ OK ]
bash# chkconfig ntpd off
bash# mv /etc/ntp.conf /etc/ntp.conf.orig
If you want to use NTP, you must add the "-x" option into the following line in the “/etc/sysconfig/ntpd” file.
##############################################
Drop root to id 'ntp:ntp' by default.
OPTIONS="-x -u ntp:ntp -p /var/run/ntpd.pid"
##############################################
# mv /etc/ntp.conf.orig /etc/ntp.conf
# service ntpd restart
bash# service ntpd status
ntpd (pid 6815) is running…
bash#
11)Login as "oracle" user and add the following lines at the end of the "/home/oracle/.bash_profile" file.
# Oracle Settings
TMP=/tmp; export TMP
TMPDIR=$TMP; export TMPDIR
ORACLE_HOSTNAME=rac1.oracle.com; export ORACLE_HOSTNAME
ORACLE_UNQNAME=RAC; export ORACLE_UNQNAME
ORACLE_BASE=/u01/app/oracle; export ORACLE_BASE
GRID_HOME=/u01/app/11.2.0/grid; export GRID_HOME
DB_HOME=$ORACLE_BASE/product/11.2.0/db_1; export DB_HOME
ORACLE_HOME=$DB_HOME; export ORACLE_HOME
ORACLE_SID=RAC1; export ORACLE_SID
ORACLE_TERM=xterm; export ORACLE_TERM
BASE_PATH=/usr/sbin:$PATH; export BASE_PATH
PATH=$ORACLE_HOME/bin:$BASE_PATH; export PATH
LD_LIBRARY_PATH=$ORACLE_HOME/lib:/lib:/usr/lib; export LD_LIBRARY_PATH
CLASSPATH=$ORACLE_HOME/JRE:$ORACLE_HOME/jlib:$ORACLE_HOME/rdbms/jlib; export CLASSPATH
if [ $USER = "oracle" ]; then
if [ $SHELL = "/bin/ksh" ]; then
ulimit -p 16384
ulimit -n 65536
else
ulimit -u 16384 -n 65536
fi
fi
Create a file called "/home/oracle/grid_env" with the following contents.
ORACLE_SID=+ASM1; export ORACLE_SID
ORACLE_HOME=$GRID_HOME; export ORACLE_HOME
PATH=$ORACLE_HOME/bin:$BASE_PATH; export PATH
LD_LIBRARY_PATH=$ORACLE_HOME/lib:/lib:/usr/lib; export LD_LIBRARY_PATH
CLASSPATH=$ORACLE_HOME/JRE:$ORACLE_HOME/jlib:$ORACLE_HOME/rdbms/jlib; export CLASSPATH
Create a file "/home/oracle/db_env" with the following contents.
ORACLE_SID=RAC1; export ORACLE_SID
ORACLE_HOME=$DB_HOME; export ORACLE_HOME
PATH=$ORACLE_HOME/bin:$BASE_PATH; export PATH
LD_LIBRARY_PATH=$ORACLE_HOME/lib:/lib:/usr/lib; export LD_LIBRARY_PATH
CLASSPATH=$ORACLE_HOME/JRE:$ORACLE_HOME/jlib:$ORACLE_HOME/rdbms/jlib; export CLASSPATH
Just reboot the VM, and make sure all the changes has been effected.
Create Shared Disks:
Shutdown the "rac1.oracle.com" virtual machine using the following command.
bash# shutdown -h now
On RAC1, create 4 sharable virtual disks.
Click on Sata Controller second + button and select "Create New Disk"

Select VDI and click Next
Select Fixed Size
Select Location and size for asm disk
Select Create
Go to File menu and select Virtual Media Manager
Select asm1.vdi and select modify
Select "Shareable" and click ok
Do the same and add asm2.vdk,asm3.vdk, and asm4.vdk disks to virtual box
Start "RAC1" virtual machine. Once started the machine, log in as root user. Now you can configure the shared disks. The current disks can be seen by issuing the following commands.
bash# cd /dev
bash# ls sd*
sda sda1 sda2 sdb sdc sdd sde sdf
bash#
Use the "fdisk" command to partition the disks sdb to sdf. The following output shows the expected fdisk output for the sdb disk.
bash# fdisk /dev/sdb
Device contains neither a valid DOS partition table, nor Sun, SGI or OSF disklabel
Building a new DOS disklabel. Changes will remain in memory only,
until you decide to write them. After that, of course, the previous
content won’t be recoverable.
The number of cylinders for this disk is set to 1305.
There is nothing wrong with that, but this is larger than 1024,
and could in certain setups cause problems with:
1) software that runs at boot time (e.g., old versions of LILO)
2) booting and partitioning software from other OSs
(e.g., DOS FDISK, OS/2 FDISK)
Warning: invalid flag 0×0000 of partition table 4 will be corrected by w(rite)
Command (m for help): n
Command action
e extended
p primary partition (1-4)
p
Partition number (1-4): 1
First cylinder (1-1305, default 1):
Using default value 1
Last cylinder or +size or +sizeM or +sizeK (1-1305, default 1305):
Using default value 1305
Command (m for help): p
Disk /dev/sdb: 10.7 GB, 10737418240 bytes
255 heads, 63 sectors/track, 1305 cylinders
Units = cylinders of 16065 * 512 = 8225280 bytes
Device Boot Start End Blocks Id System
/dev/sdb1 1 1305 10482381 83 Linux
Command (m for help): w
The partition table has been altered!
Calling ioctl() to re-read partition table.
Syncing disks.
bash#
In each case, the sequence of answers is "n", "p", "1", "Return", "Return", "p" and "w".
Once all the disks are partitioned, the results can be shows by repeating the previous "ls" command.
bash# cd /dev
bash# ls sd*
sda sda1 sda2 sdb sdb1 sdc sdc1 sdd sdd1 sde sde1 sdf sdf1
bash#
Configure ASMLib using the following command:
bash# oracleasm configure -i
Configuring the Oracle ASM library driver.
This will configure the on-boot properties of the Oracle ASM library
driver. The following questions will determine whether the driver is
loaded on boot and what permissions it will have. The current values
will be shown in brackets ('[]'). Hitting <ENTER> without typing an
answer will keep that current value. Ctrl-C will abort.
Default user to own the driver interface []: oracle
Default group to own the driver interface []: dba
Start Oracle ASM library driver on boot (y/n) [n]: y
Scan for Oracle ASM disks on boot (y/n) [y]:
Writing Oracle ASM library driver configuration: done
bash#
Load the kernel module using the following command.
bash# /usr/sbin/oracleasm init
Loading module "oracleasm": oracleasm
Mounting ASMlib driver filesystem: /dev/oracleasm
bash#
If you have any problems, run the following command to make sure you have the correct version of the driver.
bash# /usr/sbin/oracleasm update-driver
Mark the five shared disks as follows.
bash# /usr/sbin/oracleasm createdisk DISK1 /dev/sdb1
Writing disk header: done
Instantiating disk: done
bash# /usr/sbin/oracleasm createdisk DISK2 /dev/sdc1
Writing disk header: done
Instantiating disk: done
bash# /usr/sbin/oracleasm createdisk DISK3 /dev/sdd1
Writing disk header: done
Instantiating disk: done
bash# /usr/sbin/oracleasm createdisk DISK4 /dev/sde1
Writing disk header: done
Instantiating disk: done
bash#
It is unnecessary, but we can run the "scandisks" command to refresh the ASM disk configuration.
bash# /usr/sbin/oracleasm scandisks
Reloading disk partitions: done
Cleaning any stale ASM disks…
Scanning system for ASM disks…
bash#
We can see the disks are now visible to ASM using the "listdisks" command.
bash# /usr/sbin/oracleasm listdisks
DISK1
DISK2
DISK3
DISK4
bash#
The shared disks are now configured for the grid infrastructure.
Clone the Virtual Machine:
Shutdown the VM.
Manually clone the vboxrac1.vdi disk using the following commands.
cd C:\Program Files\Oracle\VirtualBox
VBoxManage clonehd E:\vboxrac1\vboxrac1.vmdk E:\vboxrac2\vboxrac2.vmdk
Create the "vboxrac2" virtual machine in VirtualBox in the same way as you did for "vboxrac1", with the exception of using an existing "vboxrac2.vdi" virtual hard drive.
Remember to add the second network adaptor as you did on the "vboxrac1" VM. When the VM is created, attach the shared disks to this VM.
cd C:\Program Files\Oracle\VirtualBox
VBoxManage storageattach vboxrac2 –storagectl "SATA Controller" –port 1 –device 0 –type hdd –medium E:\vboxrac1\asm1.vdi –mtype shareable
VBoxManage storageattach vboxrac2 –storagectl "SATA Controller" –port 2 –device 0 –type hdd –medium E:\vboxrac1\asm2.vdi –mtype shareable
VBoxManage storageattach vboxrac2 –storagectl "SATA Controller" –port 3 –device 0 –type hdd –medium E:\vboxrac1\asm3.vdi –mtype shareable
VBoxManage storageattach vboxrac2 –storagectl "SATA Controller" –port 4 –device 0 –type hdd –medium E:\vboxrac1\asm4.vdi –mtype shareable
Start the "vboxrac2" virtual machine and Ignore any network errors during the startup.
Log in to the "vboxrac2" virtual machine as the "root" user so we can reconfigure the network settings to match the following.
HOSTNAME: rac2.oracle.com
IP Address eth1: 192.168.1.109 (public address)
Default Gateway eth1: 192.168.1.1 (public address)
IP Address eth0: 192.168.0.102 (private address)
Default Gateway eth0: none
Edit the "/home/oracle/.bash_profile" file on the "vboxrac2" node to correct the ORACLE_SID and ORACLE_HOSTNAME values.
ORACLE_SID=RAC2; export ORACLE_SID
ORACLE_HOSTNAME=rac2.oracle.com; export ORACLE_HOSTNAME
Also, change the ORACLE_SID setting in the "/home/oracle/db_env" and "/home/oracle/grid_env" files.
Restart the "vboxrac2" virtual machine and start the "vboxrac1" virtual machine. Once both nodes are started, check they can both ping all the public and private IP addresses using the following commands.
ping -c 3 rac1
ping -c 3 rac1-priv
ping -c 3 rac2
ping -c 3 rac2-priv
At this point the virtual IP addresses defined in the "/etc/hosts" file will not work, so don't bother testing them.
Check the candidate ASM disks are visible on the second node using the "listdisks" command. If you are not able to see the DISKS then you may need to repeat the ASMLib configuration on the second node if the output of the following command is not consistent on both nodes.
bash# /usr/sbin/oracleasm listdisks
DISK1
DISK2
DISK3
DISK4
bash#
The virtual machine setup is completed.
Before going to next steps, shutdown your VM's and take backup of them. If any failures happen beyond this point it is probably better to switch back to those backups.
Install the Grid Infrastructure:
Make sure the "rac1" and "rac2" virtual machines are started, then login to "rac1" or switch the user to oracle and start the Oracle installer.
bash$ cd /home/oracle/sw/grid
bash$ ./runInstaller
Select the "Install and Configure Grid Infrastructure for a Cluster" option, then press the "Next" button.
Select the "Typical Installation" option, then click the "Next" button:
On the "Cluster Configuration" screen, click the "Add" button. Enter the details of the second node in the cluster, then click the "OK" button.
Click the "SSH Connectivity..." button and enter the password for the "oracle" user. Click the "Setup" button to configure SSH connectivity, and the "Test" button to test it once it is complete.
Then press "Next".
Specify Installation Locations and select "Automatic Storage Management" as Cluster registry storage type and Exter SYSASM password. Then click "Next".
Enter disk group name as "DATA" and redundancy as "External" ans select all candidate disks. Then click "Next".
Give oraInventory location
The results of prerequisite checks are shown on the next screen. You should see one warning. The failure was caused by NTP and that should be expected. Check "Ignore All" box and press "Next".
Click "Finish" on the Summary screen.
Installation is in progress.
When prompted, run the configuration scripts on each node. Execute scripts as root user, first in rac1, then in rac2.
Then click close.
Install the Database:
Make sure the "rac1" and "rac2" virtual machines are started, then login to "rac1" or switch the user to oracle and start the Oracle installer.
bash$ cd /u01/database
bash$ ./runInstaller
Uncheck the "I wish to receive security updates..." checkbox and press the "Next" button:
Click "Yes"
Select the "Create and configure a database" option and press the "Next" button:
Select the "Server Class" option and press the "Next" button:
Make sure "Real Application Cluster database installation" is chosen and both nodes are selected, and then press the "Next" button.
Select the "Typical install" option and press the "Next" button:
Enter required information and click "Next"
Wait for the prerequisite check to complete. If there are any problems, either fix them, or check the "Ignore All" checkbox and click the "Next" button.
If you are OK with the summary information, click the "Finish" button.
Wait while the installation takes place. Once the software installation is complete the Database Configuration Assistant (DBCA) will start automatically.
Once the Database Configuration Assistant (DBCA) has finished, click the "OK" button.
When prompted, run the configuration scripts on each node. When the scripts have been run on each node, click the "OK" button.
Execute scripts as root user in both nodes:
Click the "Close" button to exit the installer. Finally check the Status of the RAC.
Here you can find some useful RAC commands.
Hope this will help you :)
Thanks,
Chowdari