Showing posts with label 12c. Show all posts

Thursday, February 21, 2019

ORA-16698: 12c Dataguard Broker Setup Error

Recently I have configured dataguard on 12c database. While configuring dataguard broker I have encountered an "Error: ORA-16698: LOG_ARCHIVE_DEST_n parameter set for object to be added"
[oracle@primdb dbs]$ dgmgrl
DGMGRL for Linux: Version 12.1.0.2.0 - 64bit Production

Copyright (c) 2000, 2013, Oracle. All rights reserved.

Welcome to DGMGRL, type "help" for information.
DGMGRL> connect sys/dataguard
Connected as SYSDG.
DGMGRL> CREATE CONFIGURATION 'DR_Config' AS PRIMARY DATABASE IS 'primdb' CONNECT IDENTIFIER IS primdb;
Error: ORA-16698: LOG_ARCHIVE_DEST_n parameter set for object to be added

Failed.
DGMGRL>
SQL>

Solution:

Generally you will not receive this error on earlier database versions (Pre 12c). As per Oracle database 12c documentation, "Any LOG_ARCHIVE_DEST_n parameters that have the SERVICE attribute set, and if the NOREGISTER attribute is Not set, then you must remove/clear the 'LOG_ARCHIVE_DEST_n' before creating the broker configuration". Clear archive destination for both primary and standby side and then configure the Dataguard broker.

Once you complete the DataGuard broker setup then revert back the LOG_ARCHIVE_DEST parameter to old values in both primary and standby side.

On Primary Side:

SQL> show parameter LOG_ARCHIVE_DEST_2 NAME TYPE VALUE ------------------------------------ ----------- ------------------------------ log_archive_dest_2 string SERVICE=standb ASYNC VALID_FO R=(ONLINE_LOGFILES,PRIMARY_ROL E) DB_UNIQUE_NAME=standb SQL> SQL> alter system set LOG_ARCHIVE_DEST_2='' scope=both; System altered. SQL> DGMGRL> CREATE CONFIGURATION 'DR_Config' AS PRIMARY DATABASE IS 'primdb' CONNECT IDENTIFIER IS primdb; Configuration "DR_Config" created with primary database "primdb" DGMGRL> DGMGRL> show configuration; Configuration - DR_Config Protection Mode: MaxPerformance Members: primdb - Primary database Fast-Start Failover: DISABLED Configuration Status: DISABLED DGMGRL>

On Standby Side:

SQL> show parameter LOG_ARCHIVE_DEST_2 NAME TYPE VALUE ------------------------------------ ----------- ------------------------------ log_archive_dest_2 string SERVICE=PRIMARY ASYNC VALID_F OR=(ONLINE_LOGFILES,PRIMARY_RO LE) DB_UNIQUE_NAME=primdb SQL> alter system set LOG_ARCHIVE_DEST_2='' scope=both; System altered. SQL> DGMGRL> ADD DATABASE 'standb' AS CONNECT IDENTIFIER IS standb MAINTAINED AS PHYSICAL; Database "standb" added DGMGRL> DGMGRL> enable configuration; Enabled. DGMGRL> show configuration; Configuration - DR_Config Protection Mode: MaxPerformance Members: primdb - Primary database standb - Physical standby database Fast-Start Failover: DISABLED Configuration Status: SUCCESS (status updated 10 seconds ago) DGMGRL>
That's it.. Hope this article will help you.

Thanks,
Chowdari


Saturday, February 24, 2018

Oracle Database 12c Release 2 (12.2) Installation on Oracle Enterprise Linux 6 (OEL6)

This article describes the installation of Oracle Database 12c Release 2 on Oracle Enterprise Linux 6 (OEL6) on VirtualBox.

Introduction:

For installing 12cR2 in your laptop or desktop computer has minimum 4 GB or more of RAM required, and minimum 30GB storage required and used oracle virtualBox showed in this article.

This article uses the 64-bit versions of Oracle Enterprise Linux, and Oracle 12c Release 2 (12.2.0.1).

Prerequisite: Oracle Enterprise Linux 6 Install on VirtualBox

Download Software:

Download Oracle 12cR2 database software for Linux x86-64 from OTN or Edelivery and copy the files to linux server (on VirtualBox) using winscp or shared folder.

OS Configuration and Preparation:
1) Add the following lines to the "/etc/sysctl.conf" file
fs.file-max = 6815744
kernel.sem = 250 32000 100 128
kernel.shmmni = 4096
kernel.shmall = 1073741824
kernel.shmmax = 4398046511104
kernel.panic_on_oops = 1
net.core.rmem_default = 262144
net.core.rmem_max = 4194304
net.core.wmem_default = 262144
net.core.wmem_max = 1048576
net.ipv4.conf.all.rp_filter = 2
net.ipv4.conf.default.rp_filter = 2
fs.aio-max-nr = 1048576
net.ipv4.ip_local_port_range = 9000 65500            
2) Run the following command to change the current kernel parameters.
/sbin/sysctl -p           
3) Add the following lines to "/etc/security/limits.conf" file
oracle   soft   nofile    1024
oracle   hard   nofile    65536
oracle   soft   nproc    16384
oracle   hard   nproc    16384
oracle   soft   stack    10240
oracle   hard   stack    32768
oracle   hard   memlock    134217728
oracle   soft   memlock    134217728          
4) Create the new groups and users.
#groups for database management
groupadd -g 54321 oinstall
groupadd -g 54322 dba
groupadd -g 54323 oper         
Add user Oracle for database software
useradd -u 54321 -g oinstall -G dba,oper oracle          
5) Set the password for the "oracle" user.
passwd oracle           
6) The following packages are listed as required, including the 32-bit version of some of the packages. Many of the packages should be installed already.
 # OL6 and OL7 (RHEL6 and RHEL7)
yum install binutils -y
yum install compat-libcap1 -y
yum install compat-libstdc++-33 -y
yum install compat-libstdc++-33.i686 -y
yum install glibc -y
yum install glibc.i686 -y
yum install glibc-devel -y
yum install glibc-devel.i686 -y
yum install ksh -y
yum install libaio -y
yum install libaio.i686 -y
yum install libaio-devel -y
yum install libaio-devel.i686 -y
yum install libX11 -y
yum install libX11.i686 -y
yum install libXau -y
yum install libXau.i686 -y
yum install libXi -y
yum install libXi.i686 -y
yum install libXtst -y
yum install libXtst.i686 -y
yum install libgcc -y
yum install libgcc.i686 -y
yum install libstdc++ -y
yum install libstdc++.i686 -y
yum install libstdc++-devel -y
yum install libstdc++-devel.i686 -y
yum install libxcb -y
yum install libxcb.i686 -y
yum install make -y
yum install nfs-utils -y
yum install net-tools -y
yum install smartmontools -y
yum install sysstat -y
yum install unixODBC -y
yum install unixODBC-devel -y

# Required for 12.1, not listed for 12.2
yum install gcc -y
yum install gcc-c++ -y
yum install libXext -y
yum install libXext.i686 -y
yum install zlib-devel -y
yum install zlib-devel.i686 -y

# OL6 only (RHEL6 only)
yum install e2fsprogs -y
yum install e2fsprogs-libs -y
yum install libs -y
yum install libxcb.i686 -y
yum install libxcb -y         
7) Create directory structure as user root
mkdir -p /u01/app/oracle/product/12.2.0/dbhome_1
chown -R oracle:dba /u01
chmod -R 775 /u01          

Installation:

1) Log into the oracle user. If you are using X emulation then set the DISPLAY environmental variable.
DISPLAY=<machine-name>:0.0; export DISPLAY           
2) Unizp software it will create directory "database". Goto database directory and Start the Oracle Universal Installer (OUI) by issuing the following command.
-bash-4.1$ ls -rlt                                                                                                           
total 3376056                                                                                                                
drwxr-xr-x 7 oracle dba       4096 Jan 26  2017 database
-rw-r--r-- 1 oracle dba 3453696911 Mar  1  2017 linuxx64_12201_database.zip
-bash-4.1$
-bash-4.1$
-bash-4.1$ cd database/
-bash-4.1$ ls -rlt
total 36
-rwxr-xr-x  1 oracle dba  500 Feb  6  2013 welcome.html
drwxr-xr-x  4 oracle dba 4096 Jan 26  2017 install
-rwxr-xr-x  1 oracle dba 8771 Jan 26  2017 runInstaller
drwxr-xr-x  2 oracle dba 4096 Jan 26  2017 rpm
drwxrwxr-x  2 oracle dba 4096 Jan 26  2017 sshsetup
drwxrwxr-x  2 oracle dba 4096 Jan 26  2017 response
drwxr-xr-x 14 oracle dba 4096 Jan 26  2017 stage
-bash-4.1$ ./runInstaller
Starting Oracle Universal Installer...

Checking Temp space: must be greater than 500 MB.   Actual 3752 MB    Passed
Checking swap space: must be greater than 150 MB.   Actual 16383 MB    Passed
Checking monitor: must be configured to display at least 256 colors.    Actual 65536    Passed
Preparing to launch Oracle Universal Installer from /tmp/OraInstall2018-02-23_09-32-39PM. Please wait                     

3) Uncheck checkbox "I wish to receive security updates via My Oracle Support" and then click "Next" button.


4) Ignore following message and click “Yes” button.


5) Select install option, Here I have choosen "Install database software only", to install the database software. 
You can choose "Create and configure a database" option, If you want to install database software and create database in single shot.


6) Select Database Installation Option, Accept default “Single instance database installation” and click “Next” button 


7) Select Database Edition, You can select here type of binaries to install. Once it’s done click “Next” button.


8) Installation Location, here you should see directories for ORACLE_BASE and ORACLE_HOME for your binaries according to environmental settings. Click “Next” button.


9) Operating system groups, here you can specify OS group for each oracle group. Change default groups to dba and click “Next” button.


10) Summary, If everything isfine, then click “Install” button. It’s the last moment to come back to each of previous point and make changes.


11) Product installation


12) Execute configuration script, once binaries are installed the last step is to run root.sh script as user root.  


13) After successful installation click "Close" button.


That's it. Installed the Oracle 12cR2 software on Oracle Enterprise linux 6.

In my next post will cover database creation.

Thanks,
Chowdari

Friday, December 16, 2016

adstats.sql Fails With ORA-20011 and ORA-600

Performing database upgrade from 11.2.0.4 to 12.1.0.2 with EBS version R12.1.3. When I'm executing post DB upgrade step adstats.sql, its failed with following ORA internal error.

declare
*
ERROR at line 1:
ORA-20011: Approximate NDV failed: ORA-00600: internal error code, arguments:
[1350], [3], [23], [60], [AMERICAN], [0], [], [], [], [], [], []
ORA-06512: at "SYS.DBMS_STATS", line 36906
ORA-06512: at line 3
ORA-06512: at line 33
 
Looking at V$NLS_VALID_VALUES and it shows as,

SQL> select count(*) from V$NLS_VALID_VALUES;
select count(*) from V$NLS_VALID_VALUES
                                      *
ERROR at line 1:
ORA-00600: internal error code, arguments: [1350], [3], [23], [60], [AMERICAN],
[0], [], [], [], [], [], []

SQL>
 

Follow below steps to fix this issue:

1) Source the database environment file and check PERL5LIB variable is set correctly. If you are using RAC, then check all the nodes of a RAC environment.

Example:
 
 $ export 
 PERL5LIB=/u01/app/12102/perl/lib/5.10.0:/u01/app/12102/perl/lib/site_perl/5.10.0:/u01/app/12102/appsutil/perl
 

2) Run "perl $ORACLE_HOME/nls/data/old/cr9idata.pl" to create 9idata directory and set ORA_NLS10 parameter.

Example:
  
  $ export ORA_NLS10=/u01/app/12102/nls/data/9idata
 

3) Restart the database

4) Now run adstats.sql and also check at V$NLS_VALID_VALUES. If still issue exists please check with oracle support team.

That's it, hope this article will help you :).

Thanks,
Chowdari

Tuesday, July 12, 2016

To get lsinventory with SQL statement in 12.1.0.2

In Oracle Database 12c there's DBMS_QOPATCH package available which is very useful to query plenty of information about patches from within the database.

The DBMS_QOPATCH package provides a PLSQL/SQL interface to view the installed database patches. The interface provides all the patch information available as part of the OPATCH LSINVENTORY -XML command. The package accesses the OUI patch inventory in real time to provide patch and meta-information.

A client-server database connection won't be able to run OPatch easily and hence the DBMS_QOPATCH API is required.

Find below scripts to get lsinventory with SQL.

1)  Query to find which patches have been applied:

      SQL> set serverout on
      SQL> exec dbms_qopatch.get_sqlpatch_status;    
2)  Query to find lsinventory from SQL:

      SQL> with a as (select dbms_qopatch.get_opatch_lsinventory patch_output from dual)
                select x.*
                from a,
                xmltable('InventoryInstance/patches/*'
                passing a.patch_output
                columns
                patch_id number path 'patchID',
                patch_uid number path 'uniquePatchID',
                description varchar2(80) path 'patchDescription',
                applied_date varchar2(30) path 'appliedDate',
                sql_patch varchar2(8) path 'sqlPatch',
                rollbackable varchar2(8) path 'rollbackable') x;

3)  Query to find ORACLE_HOME and inventory:

      SQL> set pagesize 0
      SQL> set long 1000000
      SQL> select xmltransform(dbms_qopatch.get_opatch_install_info, dbms_qopatch.get_opatch_xslt) "Home and Inventory" from dual;

Hope these scripts will help you.

Thanks,
Chowdari

Friday, June 24, 2016

Creating new CDB using DBCA in 12cR1

Oracle Database 12c allows single container database (CDB) to host multiple separate pluggable databases (PDB). This post covers creating a new CDB using DBCA.

Follow below steps to create new container database using DBCA:

Step 1: Set the base parameters and Invoke DBCA


Step 2: Database Operation - Select "Create Database". Click Next.


 Step 3: Creation Mode - Select "Advanced Mode". Click Next.


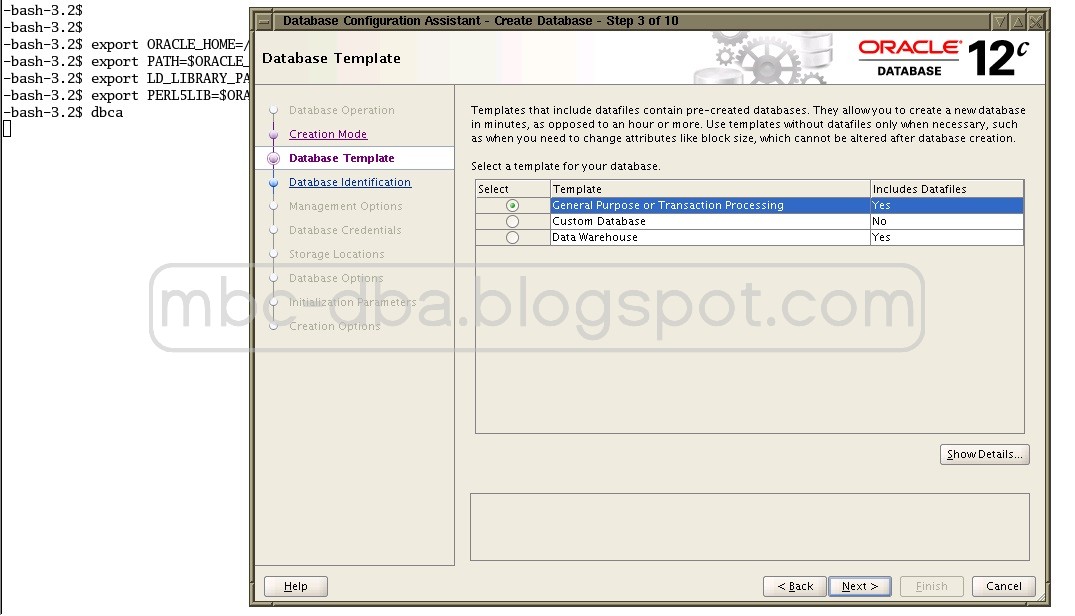
Step 4: Database Template - Select "General Purpose or Transaction Processing". Click Next.


Step 5: Database Identification - Enter Global Database Name: cdb2
SID: cdb2
Select "Create As Container Database"
Select "Create An Empty Container Database"
Click Next.


Step 6: Management Options - Deselect "Configure Enterprise Manager (EM) Database Express". Click Next.


Step 7: Database Credentials - Select "Use same Administrative password for all accounts" and Enter Password and Confirm password. Click Next.


Step 8: Network Configuration - Click Next.


Step 9: Storage Locations - Confirm Storage type is "File System". Select "Use Common Location for All Database Files". Click Next. 


Step 10: Database Options - Click Next. 


Step 11: Initialization Parameters - Select "Character Sets", Select "Use Unicode (AL32UTF8)". Click Next.


Step 12: Creation Options - Select "Create Database". Click Next.


Step 13: Pre Requisite Checks and Summary - Click Finish


Database creation is in progress


Database creation completed. Click close


Thats it. Hope this article will help you :-)

Thanks,
Chowdari

Sunday, December 21, 2014

Oracle Database 12cR1 installation (12.1.0.2) on linux

Follow below steps to install oracle database 12c Release 1 (12.1.0.2) software on Linux machine.

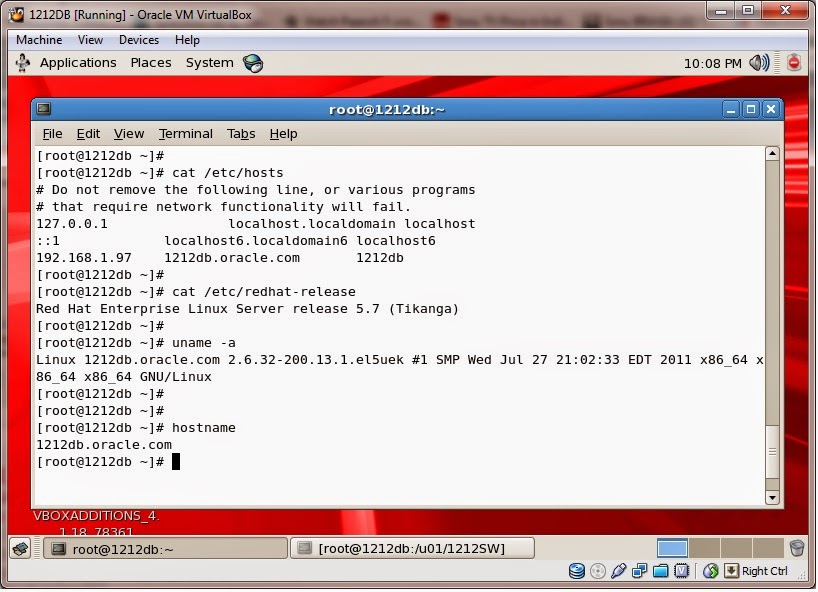
Prerequisite: Oracle Enterprise Linux 5.7 Installation

Download below selected Oracle 12.1.0.2 software (Two files) from edelivery.


Copy database software files to  /u01/1212SW location.

Start 1212DB VMachine


Follow below steps to install oracle 12cR1 database software and creation of ORCL database:

Create required group and User:

[root@1212db 1212SW]# groupadd dba
[root@1212db 1212SW]# useradd -g dba oracle
[root@1212db 1212SW]# passwd oracle
Changing password for user oracle.
New UNIX password:
BAD PASSWORD: it is based on a dictionary word
Retype new UNIX password:
passwd: all authentication tokens updated successfully.
[root@1212db 1212SW]#

Create directories and give folder permissions in which Oracle software will be installed:


Unzip the 12c database software:


Before running runInstaller open a new terminal and run xhost + as a root user:


Start Installation with run runInstaller:


 Uncheck the Updates box, Click Next and then click yes


Select 'Create and configure a database' option and click Next

Select 'Desktop class' option and click Next


Here select oracle base, software location, datafile location, database edition, character set, DB name and give password then click NEXT


 Verifying all prerequisites.


 After successful of prerequisite verification then click Install  


Open new terminal and log in as root and run below root.sh script


After run the root.sh script then click OK 


Click OK to Continue


Database installation successful wizard.


Now check the database version.


That's it..Completed Oracle 12cR1 (12.1.0.2) database installation and created new ORCL database.

Hope this will help you!!! :)

Best Regards,
Chowdari


Some Most Popular Articles