Tuesday, October 15, 2024

Implementing Case-Insensitive Pluggable Database Name with Oracle E-Business Suite Release 12.2 on Oracle Database 19c Multitenant Architecture

This article describes how to configure case-insensitive pluggable database (PDB) names in the Oracle Database 19c Multitenant Architecture for use with Oracle E-Business Suite Release 12.2.

Note: This article assumes, it is for a database without RAC and DataGuard configured and a single-node application tier.

Pre-requisites

  1. Should be Oracle E-Business Suite 12.2.3 and later. For additional information, refer to the Prerequisites section in Doc ID 2782130.1.
  2. Create appsutil.zip and copy it to the database tier.
  3. If you use a pluggable database encrypted using transparent database encryption (TDE), refer to Oracle Support Knowledge Document 2301128.1, Impact Of Renaming PDB On TDE Configuration.
  4. If you have integrated Oracle E-Business Suite with Oracle Access Manager using Oracle E-Business Suite AccessGate, you must deregister Oracle E-Business Suite from Oracle Access Manager before performing the steps to change your existing PDB name to uppercase.

Steps to setup case-insensitive pluggable database (PDB) name

  1. Stop Application Tier Services and Update Directory Object Paths
    • On the application tier node, source the environment and shut down all the application tier services
      $ cd <EBS_ROOT>
      $ . ./EBSapps.env run
      $ cd $ADMIN_SCRIPTS_HOME
      $ ./adstpall.sh 
      
    • Take a full backup of the database and application tier using your preferred backup procedure.
    • Log in as the 'oracle' user on the database tier, and run the following command to identify the directory paths that are currently stored in the UTL_FILE_DIR parameter:
      $ . <PDB name>_<hostname>.env
      $ perl $ORACLE_HOME/appsutil/bin/txkCfgUtlfileDir.pl \
         -contextfile=$CONTEXT_FILE \
         -oraclehome=$ORACLE_HOME \
         -outdir=$ORACLE_HOME/appsutil/log \
         -mode=getUtlFileDir \
         -servicetype=<onpremise|opc>
      
      The script creates a text file named <PDB name>_utlfiledir.txt in the <ORACLE_HOME>/dbs directory.
    • Create the following directories on database node
      $ mkdir -p $ORACLE_HOME/../temp/<uppercase PDB name>
      $ mkdir -p $ORACLE_HOME/appsutil/outbound/<uppercase PDB name>_<hostname>
      
    • Update the directory paths in file <ORACLE_HOME>/dbs/<PDB name>_utlfiledir.txt to match the directory paths created in the above step.
    • Run the txkCfgUtlfileDir.pl script to update the directory object paths on the database node:
      $ . <PDB Name>_<hostname>.env
      $ perl $ORACLE_HOME/appsutil/bin/txkCfgUtlfileDir.pl \
         -contextfile=$CONTEXT_FILE \
         -oraclehome=$ORACLE_HOME \
         -outdir=$ORACLE_HOME/appsutil/log \
         -mode=setUtlFileDir \
         -servicetype=<onpremise|opc>
      
  2. Rename Pluggable Database and Disable Case-Sensitive PDB Names
    • On the database node, set the environment for the CDB:
      $ cd <19c_ORACLE_HOME>
      $ . ./<CDB name>_<hostname>.env
      
    • Connect to the CDB via SQL*Plus as SYSDBA, and close the pluggable database:
      $ sqlplus / as sysdba
      SQL> alter pluggable database "<PDB name>" close instances=all;
      
    • Open the pluggable database in RESTRICTED mode:
      SQL> alter pluggable database "<PDB name>" open restricted;
      
    • While still connected to the CDB$ROOT container, change the PDB to have a temporary name
      SQL> alter pluggable database "<PDB name>" rename global_name to TEMP<uppercase PDB name>;
    • Note: This step is required as the current global_name is case-insensitive, and if you attempt to use the same name but with a different case you will receive the ORA-65042: name is already used by an existing container error.
    • Set the _pdb_name_case_sensitive initialization parameter to FALSE.
      SQL> alter system set "_pdb_name_case_sensitive"=FALSE scope=spfile;
      
      If you are using a parameter file (PFILE) for example: <19c_ORACLE_HOME>/dbs/init<SID>.ora, use a file editor and change the _pdb_name_case_sensitive initialization parameter to FALSE within the PFILE and save the change.
    • Stop and restart the container database for the initialization parameter change to take effect:
      SQL> alter session set container = CDB$ROOT;
      SQL> shutdown;     
      SQL> startup;
      
    • Connect to the CDB via SQL*Plus as SYSDBA, and close the pluggable database:
      $ sqlplus / as sysdba
      SQL> alter pluggable database TEMP<uppercase PDB name> close;
      
    • Open the pluggable database in RESTRICTED mode:
      SQL> alter pluggable database TEMP<uppercase PDB name> open restricted;
    • Connect to the CDB via SQL*Plus as SYSDBA, and rename the temporary pluggable database back to the original name, but using uppercase:
      SQL> alter pluggable database "TEMP<uppercase PDB name>" rename global_name to "<uppercase PDB name>";
      
      Run the following command to verify the change:
      SQL> show pdbs
      
      You should see the pluggable database name in uppercase.
    • The renamed PDB will still be in RESTRICTED mode. Run the following commands to restart the PDB:
      SQL> alter pluggable database <uppercase PDB name> close;
      SQL> alter pluggable database <uppercase PDB name> open;
      
  3. Configure Oracle E-Business Suite Database Tier
    • Run AutoConfig for the Pluggable Database
      Log in as oracle and set the environment as follows:
      
      $ cd <19c_ORACLE_HOME>/appsutil
      $ . ./txkSetCfgCDB.env dboraclehome=<19c_ORACLE_HOME>
      $ export ORACLE_SID=<CDB_SID>
      $ export ORACLE_UNQNAME=<19c_ORACLE_UNQNAME>
      $ export TNS_ADMIN=<19c_ORACLE_HOME>/network/admin
      
    • As the oracle user, run the txkPostPDBCreationTasks.pl script, specifying parameter values applicable to your environment. This script will create a new database tier context file and run AutoConfig. You will need to provide the APPS password when prompted.
      $ perl $ORACLE_HOME/appsutil/bin/txkPostPDBCreationTasks.pl \
              -dboraclehome=<19c_ORACLE_HOME> \
              -outdir=<19c_ORACLE_HOME>/appsutil/log \
              -cdbname=<CDB name> \
              -dbuniquename=<CDB db_unique_name> \
              -cdbsid=<CDB Instance Name> \
              -pdbsid=<Uppercase PDB Name> \
              -appsuser=<apps user> \
              -israc=no \
              -dbport=<EBS DB port> \
              -servicetype=onpremise
      
  4. Configure Oracle E-Business Suite Application Tier
    • Source the environment for the run edition file system
      $ cd <EBS_ROOT>
      $ . ./EBSapps.env run
      
    • Create a new application tier context file by running the following command, and setting the APPLPTMP value to one of the values represented by the s_db_util_filedir database tier context file variable:
      $ perl $AD_TOP/patch/115/bin/txkAppsDBConfig.pl \
              contextfile=<path to existing run CONTEXT_FILE> \
              dbhost=<DB host|Scan Host> \
              dbdomain=<DB Domain|Scan domain> \
              dbport=<EBS DB port|Scan Port> \
              dbsid=<uppercase PDB name> \
              applptmp=<APPLPTMP>
      
    • As the case of the PDB name has now changed, the CONTEXT_NAME based on that value has also changed. Use a text editor such as vi to amend the Oracle HTTP Server (OHS) httpd.conf and ssl.conf configuration files under the $FMW_HOME on both the run and patch file systems, updating all relevant CONTEXT_NAME values with the new CONTEXT_NAME.
    • Specifying the new context file generated on the run edition file system, run AutoConfig to propagate the changes
      $ $AD_TOP/bin/adconfig.sh contextfile=<new run CONTEXT_FILE>
      
    • Source the new environment file of the run edition file system:
      $ cd <EBS_ROOT>
      $ . ./EBSapps.env run
      
      You can use the following command to confirm the environment variable FILE_EDITION points to the run edition file system:
      $ echo $FILE_EDITION
      
    • Run the following command to regenerate the configuration files on the patch file system and upload the patch context file to the database:
      $ perl $AD_TOP/patch/115/bin/txkPatchAppsConfig.pl patchcontextfile=<new patch CONTEXT_FILE>
      
    • Start the application tier services:
      $ cd <EBS_ROOT>
      $ . ./EBSapps.env run
      $ cd $ADMIN_SCRIPTS_HOME
      $ ./adstrtal.sh
      
  5. If you have implemented any integrations that connect an external node to Oracle E-Business Suite, you must now reconfigure those integrations with the updated DBC file.
Hope this article will be helpful.


Monday, October 14, 2024

Oracle WebLogic Server 12cR2 (12.2.1) Installation on Oracle Linux (OL7u9)

Before initiating the installation of the WebLogic server, it would be helpful to review the article - Oracle WebLogic Server Overview to understand the terminologies and concepts of Oracle WebLogic Server.

Please note: This article assumes that you have an existing machine with Oracle Linux 7.9 installed and the required software downloaded, as mentioned in the prerequisite section.

Pre-requisites:

  • Download and install JDK1.8 (1.8.0_241)
  • Download Weblogic 12.2.1.4 (fmw_12.2.1.4.0_infrastructure.jar)
  • Create a new group 'dba' and 'oracle' user
  • Create the required directories and set the following environment variables
export ORACLE_BASE=/u01/app/oracle
export ORACLE_HOME=/u01/app/oracle/product/12.2.1
export MW_HOME=$ORACLE_HOME
export WLS_HOME=$MW_HOME/wlserver
export WL_HOME=$WLS_HOME
export DOMAIN_BASE=/u01/app/oracle/config/domains
export DOMAIN_HOME=$DOMAIN_BASE/mydomain
export JAVA_HOME=/u01/app/oracle/jdk18_241
export PATH=$JAVA_HOME/bin:$PATH
  • create /etc/oraInst.loc and add the following line in /etc/oraInst.loc 
inventory_loc=/u01/app/oraInventory

Installation:

Run the installer as the "oracle" user.
$ java -jar fmw_12.2.1.4.0_infrastructure.jar

Click the "Next" button on the welcome screen.


Select the "Skip Auto Updates" option, then click the "next" button.


Enter the middleware home and click the "Next" button.


Accept the "Fusion Middleware Infrastructure" option by clicking the "Next" button.


Wait for the prerequisite checks to complete. If there are failures, correct them and rerun the checks. If there are no failures, click the "Next" button.


Either enter your support details or uncheck the security updates checkbox. Click the "Next" button.  On the warning dialog, click the "Yes" button.


Review the summary information, and click the "Install" button.


Wait for the installation, then click the "Next" button.


On the installation complete screen, click the "Finish" button to launch the Configuration Wizard.

Creating WebLogic Domain

Launch the Configuration Wizard with the following command:
$ $ORACLE_HOME/oracle_common/common/bin/config.sh

Select the "Create a new domain" option, enter the domain name at the end of the "Domain Location", then click the "Next" button.


Select the required product template and click the "Next" button.


Enter the weblogic credentials and click the "Next" button.


Select domain mode as "Production" and JDK details, then click the "Next" button.


Select any required advanced configuration options. 


Review the configuration summary screen, and click the "Create" button.


Once the domain is created, click the "Next" button.

Please make sure to remember the Admin Server URL and then click the "Finish" button.

Once the server is started you can access the administrator console using the URL "http://hostname:port/console".


Hope this article will be helpful.

Thursday, October 10, 2024

Oracle WebLogic Server Overview

  • Is a Java EE application server hosting Java EE applications
  • Is a completely compliant with Java EE 7
  • Provides clustering for load balancing and high availability
  • Offers an extensible security realm for authentication, authorization, and so on
  • Runs the "Java components" of Oracle Fusion Middleware (FMW). These include Oracle SOA Suite, Oracle Service Bus, Oracle WebCenter Suite, and some Oracle Identity Management components
  • Can control "System components" of FMW, such as Oracle HTTP Server (OHS), and Oracle Traffic Director (OTD).


System Architecture


  • Clients using the World Wide Web to access applications.
  • A firewall (hardware or software designed to prevent unauthorized access to or from a private network by using filtering or blocking ports)
  • A cluster proxy of either a hardware load balancer or a web server like OHS
  • A cluster of WebLogic Servers on various machines (each one running applications)
  • Various back-end systems and databases accessed by the applications running on WebLogic Server
Other advanced architectural elements:
  • Additional firewalls
  • Multiple WebLogic Server clusters
  • Multiple load balancers, or hardware load balancers in front of multiple web servers


WebLogic Server Domain


A domain is a collection of WebLogic Server resources. There are different kinds of resources in a domain, including WebLogic Servers, deployed applications, clusters, security providers, and Java Message Service and Java Database Connectivity elements.

All domains contain a special server called the administration server. The administration server is only used for domain configuration and manage all of the domain resources.

The other WebLogic Servers in the domain are called managed servers. In most domains, the applications are deployed to the managed servers. 

A single WebLogic Server product installation can be used to create and run multiple domains, or multiple product installations can be used to run a single domain. How domains are defined is up to you. You can define multiple domains based on different system administrators' responsibilities, application boundaries, or geographical locations of the machines on which servers run.

Managed Servers


A domain can have zero or more managed servers.

A managed server:
  • Is managed by the administration server
  • Is an instance of WebLogic Server and, therefore, a fully functional Java Enterprise Edition application server
  • Is where your Java Enterprise Edition applications run
  • Web applications, EJBs, web services, enterprise applications
  • Can be clustered with other cooperating managed servers for availability, scalability, and automatic failover


Node Manager


  • Is a WebLogic server utility, that enables us to start, stop, and restart both admin server and managed server instances from the remote location
  • Monitors server availability and can restart failed servers
  • Can be used to migrate servers on a failed machine to another machine
  • Can also manage OHS, OTD, and OID components

Hope this article will be helpful.
In my upcoming article, I will cover the installation of Oracle WebLogic Server 12c.

Wednesday, June 14, 2023

Oracle EBS R12.2.12 with Database 19c VM Virtual Appliance for On-Premise now available

Oracle released the E-Business Suite Release 12.2.12 with 19c Database Single node Vision virtual appliance for On-Premise. Please note that the EBS instance that comes with Vision Instance which means you cannot use this for any Production, DEV or Test environments. Oracle EBS Vision instances are used only for Training, Demo purpose. 

12.2.12 Virtual Appliance Contains:

  • Vision Database
  • DB 19c (19.18 RU)
  • FMW 11.1.1.9
  • Apr2023 EBS CPU
  • Jan2023 CPU/PSU for the technology components.
  • System schema migration completion patch

Below are the high level steps to Deploy EBS R12.2.12 VM appliance:

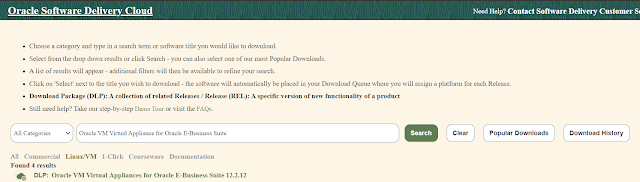
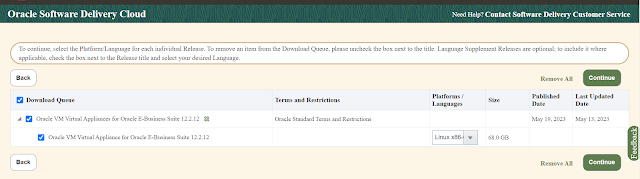
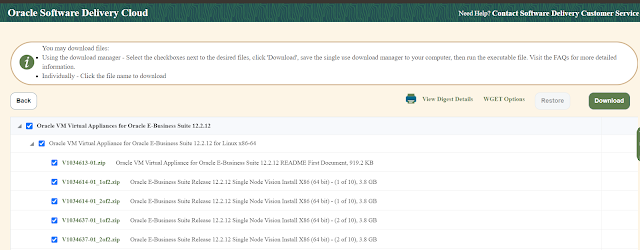
  • Download the Oracle EBS VM Appliance software from Oracle E-Delivery Site i.e. edelivery.oracle.com
  • Reconstruct and Stage the Downloaded Appliance using script-based (assemble.sh) or manual method
  • Import the VirtualBox Appliance Using Oracle VM VirtualBox Manager or Oracle VM Manager 
  • Start VM and Configure EBS installation and Launch EBS console


Download Oracle EBS 12.2.12 VM Appliance:


Follow the MOS Note: 2933812.1 for deploying the EBS R12.2.12 VM appliance.


That's it, hope this information will help you.

Thank You!!


Tuesday, January 26, 2021

EBS 12.2.10 with Database 19c VM Virtual Appliance for On-Premise now available

Oracle released the E-Business Suite Release 12.2.10 with 19c Database Single node Vision with October 2020 CPU VM virtual appliance for On-Premise. Please note that the EBS instance that comes with VM Appliance is a Vision Instance which means you cannot use this for any Production, DEV or Test environments. Oracle EBS Vision instances are used only for Training, Demo purpose. 

This is the first EBS Vision Instance with 19c Database VM Appliance released for On-Premise. 

Below are the high level steps to Deploy EBS R12210 VM appliance:

  • Download the Oracle EBS VM Appliance software from Oracle E-Delivery Site i.e. edelivery.oracle.com
  • Reconstruct and Stage the Downloaded Appliance using script-based (assemble.sh) or manual method
  • Import the VirtualBox Appliance Using Oracle VM VirtualBox Manager or Oracle VM Manager 
  • Start VM and Configure EBS installation and Launch EBS console


Download Oracle EBS VM Appliance software:


Follow the MOS Note: 2717713.1 for deploying the EBS R12210 VM appliance.

Blog Article: https://blogs.oracle.com/ebstech/ebs-12210-with-database-19c-vm-virtual-appliance-for-on-premises


That's it, hope this information will help you.

Thank You!!

Some Oracle EBS with database 19c based articles:

Oracle EBS R12 with Database 19c - Administration

UTL_FILE_DIR Desupported with Oracle Database 19c

Upgrade Oracle 11g/12c Database to 19c with EBS R12.1/R12.2

Oracle Database 19c Installation on Oracle Linux 7 (OL7)

How To Rename A Pluggable Database (PDB) in Oracle EBS R122 with 19c Database

Some Oracle RAC and ASM based articles:


Saturday, November 21, 2020

How To Rename A Pluggable Database (PDB) in Oracle EBS R122 with 19c Database

Go through the following steps to rename the Pluggable Database (PDB) in Oracle EBS R122 with 19c database.

Here I am changing PDB name from "TESTHYD1" to "TESTBAN1".

Connect to the CDB and check the information about the PDB:

SQL> select name, open_mode, restricted from v$pdbs;

NAME       OPEN_MODE       RES
---------- --------------- ---
PDB$SEED   READ ONLY       NO
TESTHYD1   READ WRITE      NO

SQL> 

Close the PDB and check the status:

SQL> alter pluggable database "TESTHYD1" close;                

Pluggable database altered.

SQL> show pdbs

    CON_ID CON_NAME                       OPEN MODE  RESTRICTED
---------- ------------------------------ ---------- ----------
         2 PDB$SEED                       READ ONLY  NO        
         3 TESTHYD1                       MOUNTED              
SQL>  

Unplug the "TESTHYD1" PDB database and Drop it:

SQL> alter pluggable database "TESTHYD1" unplug into '/u01/HYDSER01/19.0.0/dbs/TESTHYD1_unplug.xml';

Pluggable database altered.

SQL>
SQL> drop pluggable database "TESTHYD1";

Pluggable database dropped.

SQL> 

Create pluggable database using the <DBSID>_unplug.xml file

SQL> create pluggable database "TESTBAN1" using '/u01/HYDSER01/19.0.0/dbs/TESTHYD1_unplug.xml' NOCOPY SERVICE_NAME_CONVERT=('ebs_TESTHYD1','ebs_TESTBAN1','TESTHYD1_ebs_patch','TESTBAN1_ebs_patch');

Pluggable database created.

SQL>

Open "TESTBAN1" pluggable database in read write mode:

SQL> alter pluggable database "TESTBAN1" open read write;

Pluggable database altered.

SQL> 

Startup the PDB and save its state by executing the following commands

SQL> alter pluggable database all open;

Pluggable database altered.

SQL> alter pluggable database all save state instances=all;

Pluggable database altered.

SQL> show pdbs

    CON_ID CON_NAME                       OPEN MODE  RESTRICTED
---------- ------------------------------ ---------- ----------
         2 PDB$SEED                       READ ONLY  NO
         4 TESTBAN1                       READ WRITE NO
SQL> 

Note: The PDB should be renamed only using the above approach to retain the case of the PDB name in E-Business Suite.

That's it, hope this article will help you.

Thank you!!


Some Oracle EBS with database 19c based articles:

Oracle EBS R12 with Database 19c - Administration

UTL_FILE_DIR Desupported with Oracle Database 19c

Upgrade Oracle 11g/12c Database to 19c with EBS R12.1/R12.2

Oracle Database 19c Installation on Oracle Linux 7 (OL7)

Some Oracle RAC and ASM based articles:


Tuesday, September 22, 2020

Upgrade Oracle 11g/12c Database to 19c with EBS R12.1/R12.2

Below are the highlited steps to upgrade your Oracle 11g/12c Database to 19c with EBS R12.1/R12.2

1. Install Oracle Database 19c Binaries

2. Apply additional 19c RDBMS patches

3. Apply 19c interoperability patches on application R12.1/R12.2

4. Create an empty container database (CDB) without a PDB

5. Run pre-upgrade diagnostic reports

6. Upgrade the database from 11g/12c to 19c using DBUA

7. Perform post Database Upgrade steps (run post fix-up script)

8. Convert Database to Multitenant Architecture (Non-CDB to PDB)

9. Perform Post Database upgrade steps

Most of the steps are similar to earlier upgrades (11g to 12c) and straightforward.

The only tricky part in 19c is converting the Database to Multi-tenant architecture which has to be done cautiously. In database 19c version Multi-tenant conversion is compulsory.


Some 19c based articles:


Thanks You !!

Thursday, September 3, 2020

ORA-39142: incompatible version number 5.1 in dump file

Recently I have encountered below error while importing database dump file on Oracle Database 11gR2 and dump file was exported from 19c database.

ORA-39001: invalid argument value
ORA-39000: bad dump file specification
ORA-39142: incompatible version number 5.1 in dump file "/u01/HYDSERVER/admin/rhyddb22/dpdump/testing.dmp"
This is basically downgrade situation, because we are exporting dump file in 19c database and importing it into 11g database. To overcome this error, while exporting the dump file in 19c database we need to explicitly use VERSION parameter which specified to be the target COMPATIBLE initialization parameter. 

Here in my case, the target database COMPATIBLE initialization parameter is 11.2. So need to specify same value for the VERSION parameter during export the dump file. 

Source side on 19c database with compatible 19.0.0:
-bash-4.2$ expdp directory=DATA_PUMP_DIR dumpfile=testing.dmp logfile=testing.log tables=testing_tables version=11.2
Target side on 11gR2 database with compatible 11.2:
-bash-4.2$ impdp directory=DATA_PUMP_DIR dumpfile=testing.dmp logfile=testing_imp.log  tables=testing_tables
That's it, hope this article will help you.

Thank you !!

Tuesday, July 28, 2020

Oracle EBS R12 with Database 19c - Administration

Oracle recently announced that Oracle Database 19c is certified with Oracle E-Business Suite Release 12.1 / 12.2.  You may now start planning your database upgrade from 11g or 12c to 19c. The minimum certified version of Oracle Database 19c for Oracle EBS is Oracle Database 19c (19.3). Oracle Database 19c offers customers the best performance, scalability, reliability, and security for all their operational and analytical workloads.

What's New For EBS With Oracle Database 19c:


There are several mandatory architecture updates when you upgrade your Oracle E-Business Suite database to Oracle Database 19c.  The following is a summary of the key required architectural changes:

Container Database (CDB) Architecture:


With the Database 19c certification EBS R12.1/R12.2 on-premises databases are now certified with the CDB architecture (multitenant architecture).

It is important for you to pay particular attention to the following points:
  • A CDB with one PDB (single tenant) is currently the only certified deployment for Oracle E-Business Suite with Database 19c.
  • A CDB with multiple PDBs (multitenant) is not currently certified for Oracle E-Business Suite.
  • A non-CDB architecture is not planned to be certified or supported for EBS with Database 19c.
As part of the upgrade to Database 19c, you will convert your EBS database to the CDB architecture with a single pluggable database (PDB) i.e EBS database.

In EBS 19c database, it contains two environment files one for CDB and the other one for PDB and one Context file. The CONTEXT_FILE points to PDB database. when we source the PDB environment then only we can find the database CONTEXT_FILE.

All EBS specific tasks on the database side should be performed only on EBS instance, which is Pluggable database (PDB) in this case. Also, EBS specific database initialization parameters must be updated only in the pluggable database (EBS_PDB).

Database Tier Environment Sourcing:

  1. To source EBS CDB -  <EBS CDB>_<hostname>.env 
  2. To source EBS PDB -   <EBS PDB>_<hostname>.env 
1) How to source and connect the Oracle E-Business Suite CDB environment as SYSDBA?
Oracle E-Business Suite database CDB environment files are located in the database ORACLE_HOME. 
Run the following commands to connect the CDB dtabase

$ cd $ORACLE_HOME

$ source <CDB_NAME>_<NODE_NAME>.env

$ sqlplus "/ as sysdba"

2) How to start the CDB that hosts the Oracle E-Business suite PDB?

Run the following commands to start the CDB

$ source <CDB_NAME>.<NODE_NAME>.env

$ sqlplus "/ as sysdba"

SQL> startup; 

3) How to shutdown the CDB that hosts the Oracle E-Business suite PDB?

Run the following commands to shutdown CDB database

$ source <CDB_NAME>_<NODE_NAME>.env

$ sqlplus "/ as sysdba"

SQL> shutdown normal;
Two scripts introduced in EBS Database 19c to start and stop the CDB database and listener.
  • adcdbctl.sh
  • adcdblnctl.sh

4) How to source and connect the Oracle E-Business Suite PDB environment as SYSDBA?

Run the following commands to connect the EBS PDB database

$ source <CDB_NAME>_<NODE_NAME>.env

$ export ORACLE_PDB_SID=<PDB NAME>

$ sqlplus "/ as sysdba"

5) How to open the Oracle E-Business Suite PDB?

Source the CDB environment file, connect to the CDB as SYSDBA, then execute the SQL command to start the PDB:

$ source <CDB_NAME>_<NODE_NAME>.env

$ sqlplus "/ as sysdba"

SQL> alter pluggable database open read write services=all;

6) How to close the Oracle E-Business Suite PDB?

Source the CDB environment file, connect to the CDB as SYSDBA, then execute the SQL command to stop the PDB:

$ source <CDB_NAME>_<NODE_NAME>.env

$ sqlplus "/ as sysdba"

SQL> alter pluggable database <EBS PDB Name> close immediate; 

7) How to find Oracle E-Business Suite PDB information and status?

$ source <CDB_NAME>_<NODE_NAME>.env

$ sqlplus "/ as sysdba"

SQL> show pdbs;

Returns the values for the con_id, con_name, open mode, restricted values of all your PDBs.

SQL> select name, open_mode from v$pdbs; 

8) How to connect the Oracle E-Business Suite PDB as APPS user?

Run the following commands to connect PDB as APPS user

$ source <PDB_NAME>_<NODE_NAME>.env

$ sqlplus apps/apps@<PDB_NAME>

9) How to connect the Oracle E-Business Suite PDB as SYSTEM user?

Run the following commands to connect PDB as SYSTEM user

$ source <PDB_NAME>_<NODE_NAME>.env

$ sqlplus system/manager@<PDB_NAME>

10) How to access the Oracle E-Business Suite PDB while logged into the CDB?

Use the following command to set the environment, show the PDB name, and then connect to that PDB:

$ source <CDB_NAME>_<NODE_NAME>.env

$ sqlplus "/ as sysdba"

SQL> show pdbs;

SQL> alter session set container="PDBNAME";

11) Where to look for PDB errors if encounter a problem?

Source the environment and then review any plugin violations, as shown in the following example:

$ source <CDB_NAME>_<NODE_NAME>.env

$ sqlplus "/ as sysdba"

SQL> select name, cause, message, status from PDB_PLUG_IN_VIOLATIONS;

12) How to run AutoConfig on the database tier 

You should always source the Oracle E-Business Suite PDB environment before running AutoConfig. You can do so by running the following commands:

$ cd $ORACLE_HOME

$ source <PDB_NAME>_<NODE_NAME>.env 

Then run AutoConfig script

13) How to set up the environment to run an adgrants.sql?

Execute following steps before running Oracle E-Business Suite programs such as adgrants.sql.

$ source <CDB_NAME>_<NODE_NAME>.env

$ export ORACLE_PDB_SID=<PDB_NAME>

$ sqlplus "/ as sysdba"

14) How to run the EBS Technology Codelevel Checker (ETCC) against Oracle E-Business Suite PDB?

- The EBS Technology Codelevel Checker (ETCC) utility provides two scripts to help ensure you have the necessary database and application tier patches installed on your Oracle E-Business Suite Release 12.2 instance.

- ETCC extracts environment-related information from the context file (using the location defined in $CONTEXT_FILE), so you need to source the Oracle E-Business Suite PDB environment before you run the database checker script.

$ source <EBS PDB Name>_<NODE_NAME>.env

$ ./checkDBpatch.sh

15) How to list the OPatch inventory for a multitenant?

You can list the OPatch inventory of a multitenant database in the same way as for non-CDB. 

$ source <CDB_NAME>_<NODE_NAME>.env

$ export PATH=$PATH:$ORACLE_HOME/OPatch

$ opatch lsinventory –detail

16) How to set up the environment to install a database patch in an Oracle E-Business Suite multitenant database?

Source the CDB environment and add the OPatch directory to the path, as shown in the following example:

$ source <CDB_NAME>_<NODE_NAME>.env

$ export PATH=$PATH:$ORACLE_HOME/OPatch

17) Update Database Initialization Parameter at PDB level

  • By default, initialization parameters at the PDB level inherit the value from the initialization parameters at the CDB level.
  • There are parameters that can be changed at the PDB level and override what is being inherited from the CDB.
  • To identify which parameters can be modified for a PDB, the ISPDB_MODIFIABLE column in the V$SYSTEM_PARAMETER view must be TRUE.  If the ISPDB_MODIFIABLE is TRUE then the parameter inherits the value from the CDB until it is changed with an ALTER SYSTEM SET command at the PDB.
  • The initialization parameter set at the PDB level aren't stored in the spfile. They are stored in a data dictionary table in the root of the CDB (SYS.PDB_SPFILE$).
  • When a PDB is moved around (through an unplug/plug), the initialization parameters set at the PDB level are part of the metadata stored in the XML file used for the unplug/plug.
  • To reset a database parameter at PDB level
source <EBS CDB>_<hostname>.env

export ORACLE_PDB_SID=<EBS PDB SID>

sqlplus "/as sysdba"

Example: alter system set "_disable_actualization_for_grant"=TRUE; 

To check what all DB parameters can be set at PDB leve, following query can be used: 

SELECT NAME,ISPDB_MODIFIABLE FROM V$SYSTEM_PARAMETER WHERE UPPER(NAME) IN ('PROCESSES','SESSIONS','OPEN_CURSORS','_DISABLE_ACTUALIZATION_FOR_GRANT') ORDER BY 2,1;

Check value of DB parameters at CDB and PDB level:

SELECT CON_ID,NAME,DISPLAY_VALUE FROM V$SYSTEM_PARAMETER WHERE UPPER(NAME) IN ('<db parameter name>') ORDER BY 1,2,3;

UTL_FILE_DIR:

UTL_FILE_DIR is desupported with 19c database. UTL_FILE_DIR is a database pfile parameter. Which is used for EBS custom code or products requres access for read write file Operations on file system. 

Go through the article for more details - UTL_FILE_DIR Desupported with Oracle Database 19c

Hope this article will help you.

Best Regards,

UTL_FILE_DIR Desupported with Oracle Database 19c

UTL_FILE_DIR is desupported with 19c database. UTL_FILE_DIR is a database pfile parameter. Which is used for EBS custom code or products requres access for read write file Operations on file system. 

In Database 19c, the UTL_FILE_DIR replaced with database directory objects.

With the EBS database upgrade to Database 19c, an equivalent Directory Object will be created for each UTL_FILE_DIR entry Pre-existing EBS product code and custom code will continue to function.

Query to find UTL_FILE_DIR location in EBS Database 19c:
select value from APPS.v$parameter where name='utl_file_dir';

To add a new directory path to the UTL_FILE_DIR parameter:
1) Source the PDB environment file
   
    . $ORACLE_HOME/<<pdb_name>>_<<hostname>>.env

2) Create the new directory path. 

    For example: $mkdir /u01/debuglogdir

3) run the txkCfgUtlfileDir.pl script in addUtlFileDir mode

    $ perl $ORACLE_HOME/appsutil/bin/txkCfgUtlfileDir.pl -contextfile=$CONTEXT_FILE -oraclehome=$ORACLE_HOME \ 
-outdir=$ORACLE_HOME/appsutil/log -mode=addUtlFileDir
      a) When prompted, enter the passwords for the APPS user (the Oracle E-Business Suite database user) and for the SYSTEM user of the root container database (CDB).
      b) When prompted, enter the physical directory path you want to add.

4) Finally, synchronize the modified UTL_FILE_DIR value with the database context file. To do so, run the txkCfgUtlfileDir.pl script in syncUtlFileDir mode using the following commands:

    $ perl $ORACLE_HOME/appsutil/bin/txkCfgUtlfileDir.pl -contextfile=$CONTEXT_FILE -oraclehome=$ORACLE_HOME -outdir=$ORACLE_HOME/appsutil/log -mode=syncUtlFileDir
    

To modify or delete a directory path in the UTL_FILE_DIR parameter:
1) First, retrieve the list of directory paths that are currently stored in the UTL_FILE_DIR supplemental parameter. To do so, source the PDB environment file and then run the txkCfgUtlfileDir.pl script in getUtlFileDir mode using the following commands:

    $ . $ORACLE_HOME/<<pdb_name>>_<<hostname>>.env
    $ perl $ORACLE_HOME/appsutil/bin/txkCfgUtlfileDir.pl -contextfile=$CONTEXT_FILE -oraclehome=$ORACLE_HOME -outdir=$ORACLE_HOME/appsutil/log -mode=getUtlFileDir
    a) With this command, the script creates a text file named _utlfiledir.txt in the /dbs directory.
    b) Edit the text file to modify any changed directory path or delete any directory path that you no longer need. If you modify a directory path, ensure that you have created the directory at the new location.

2) To update the value of the supplemental UTL_FILE_DIR parameter with the changes

    $ perl $ORACLE_HOME/appsutil/bin/txkCfgUtlfileDir.pl -contextfile=$CONTEXT_FILE -oraclehome=$ORACLE_HOME -outdir=$ORACLE_HOME/appsutil/log -mode=setUtlFileDir

3) Finally, synchronize the modified UTL_FILE_DIR value with the database context file.

    $ perl $ORACLE_HOME/appsutil/bin/txkCfgUtlfileDir.pl -contextfile=$CONTEXT_FILE -oraclehome=$ORACLE_HOME -outdir=$ORACLE_HOME/appsutil/log -mode=syncUtlFileDir

That's it. Hope this article will help you.

Best Regards..

Friday, June 26, 2020

Opatch LsInventorySession Failed: Inventory Load Failed

Today I have hit the following issue while executing the 'opatch lsinventory'  command in 11gR2  database.
-bash-3.2$ $ORACLE_HOME/OPatch/opatch lsinventory -invPtrLoc $ORACLE_HOME/oraInst.loc
Oracle Interim Patch Installer version 11.2.0.3.4                                    
Copyright (c) 2012, Oracle Corporation.  All rights reserved.                        


Oracle Home       : /u01/db_hyd/11.2.0.4
Central Inventory : /u01/db_hyd/oraInventory
   from           : /u01/db_hyd/11.2.0.4/oraInst.loc
OPatch version    : 11.2.0.3.4
OUI version       : 11.2.0.4.0
Log file location : /u01/db_hyd/11.2.0.4/cfgtoollogs/opatch/opatch2020-06-23_05-36-23AM_1.log

List of Homes on this system:

Inventory load failed... OPatch cannot load inventory for the given Oracle Home.
Possible causes are:
   Oracle Home dir. path does not exist in Central Inventory
   Oracle Home is a symbolic link
   Oracle Home inventory is corrupted
LsInventorySession failed: OracleHomeInventory gets null oracleHomeInfo

OPatch failed with error code 73
-bash-3.2$ 

Based on the error message "LsInventorySession failed: OracleHomeInventory gets null oracleHomeInfo", it seems to be ORACLE_HOME '<ORACLE_HOME>' is not registered in the Central Inventory i.e 'Central Inventory : /u01/db_hyd/oraInventory'. To fix this issue we can register or attach the database ORACLE_HOME information to the existing Central Inventory.

Execute following steps to fix this issue:


1) Backup the existing oraInventory (Central Inventory : /u01/db_hyd/oraInventory)
-bash-3.2$ cp -r oraInventory oraInventory.Orig
-bash-3.2$ 
2) Register or Attach the database ORACLE_HOME information to the existing Central Inventory using following command.
-bash-3.2$ cd $ORACLE_HOME/oui/bin                        
-bash-3.2$ ./attachHome.sh                                
Starting Oracle Universal Installer...                    

Checking swap space: must be greater than 500 MB.   Actual 32767 MB    Passed
The inventory pointer is located at /etc/oraInst.loc                         
The inventory is located at /u01/db_hyd/oraInventory                             
'AttachHome' was successful.    
-bash-3.2$ 
3) Now execute 'OPatch lsinventory' command to check the ORACLE_HOME details
-bash-3.2$ $ORACLE_HOME/OPatch/opatch lsinventory -detail 

Hope this article will help you :-)

Monday, April 20, 2020

R12 Start Apache Throws an 'Error While Loading Shared Libraries: libdb.so.2' on Linux

After cloning an Oracle EBS Release 12 instance on a Linux server, following error occur while starting up the Apache service.

Apache/HTTP Startup Log:
Executing service control script:
/u01/R12EBS/inst/apps/r12hyupg_hydhost02/admin/scripts/adapcctl.sh start
script returned:                                                          
**************************************************** 
You are running adapcctl.sh version 120.6.12000000.4

Starting OPMN managed Oracle HTTP Server (OHS) instance ...
opmnctl: opmn is already running.                          
opmnctl: starting opmn managed processes...                
================================================================================
opmn id=hydhost02:6210                                                           
    0 of 1 processes started.                                                   

ias-instance id=r12hyupg_hydhost02.hydhost02.example.com
++++++++++++++++++++++++++++++++++++++++++++++++++++++++++++++++++++++++++++++++
--------------------------------------------------------------------------------
ias-component/process-type/process-set:                                         
    HTTP_Server/HTTP_Server/HTTP_Server/                                        

Error
--> Process (index=1,uid=453192016,pid=10658)
    failed to start a managed process after the maximum retry limit
    Log:                                                           
    /u01/R12EBS/inst/apps/r12hyupg_hydhost02/logs/ora/10.1.3/opmn/HTTP_Server~1


adapcctl.sh: exiting with status 0

adapcctl.sh: check the logfile /u01/R12EBS/inst/apps/r12hyupg_hydhost02/logs/appl/admin/log/adapcctl.txt for more information ... 

HTTP/Apache log file:

Logfile: /u01/R12EBS/inst/apps/r12hyupg_hydhost02/logs/ora/10.1.3/opmn/HTTP_Server~1

20/04/20 05:52:23 Start process
--------
/u01/R12EBS/inst/apps/r12hyupg_hydhost02/ora/10.1.3/Apache/Apache/bin/apachectl startssl: execing httpd
/u01/R12EBS/apps/tech_st/10.1.3/Apache/Apache/bin/httpd: error while loading shared libraries: libdb.so.2: cannot open shared object file: No such file or directory

Here I noticed that, the error is very clear about the Soft link libdb.so.2 is missing.

Status of the Apache/HTTP_server Services:  http web server unable to start due to missing library.
-bash-4.1$ ./adopmnctl.sh status apps/apps

You are running adopmnctl.sh version 120.4.12000000.3

Checking status of OPMN managed processes...

Processes in Instance: r12hyupg_hydhost02.hydhost02.example.com
-------------------+--------------------+---------+---------
ias-component      | process-type       |     pid | status
-------------------+--------------------+---------+---------
default_group      | oafm               |   10916 | Alive
default_group      | forms              |   10814 | Alive
default_group      | oacore             |   10696 | Alive
HTTP_Server        | HTTP_Server        |     N/A | Down


adopmnctl.sh: exiting with status 0

adopmnctl.sh: check the logfile /u01/R12EBS/inst/apps/r12hyupg_hydhost02/logs/appl/admin/log/adopmnctl.txt for more information ...

-bash-4.1$

Solution for this issue:
  1. Shutdown all application services.
  2. create soft link for library file  (ln -s /usr/lib/libgdbm.so.2.0.0 /usr/lib/libdb.so.2)
  3. Startup all application services.

1) Stopped Application tier services.

2) Create Softlink for library file.

-bash-4.1$ ls -rlt libgdbm.so.2.0.0
-rwxr-xr-x. 1 ovsroot root 24800 Jul 23  2010 libgdbm.so.2.0.0
-bash-4.1$ ls -rlt /usr/lib/libdb.so.2
ls: cannot access /usr/lib/libdb.so.2: No such file or directory
-bash-4.1$

# ln -s /usr/lib/libgdbm.so.2.0.0 /usr/lib/libdb.so.2
#

-bash-4.1$ ls -rlt libgdbm.so.2.0.0
-rwxr-xr-x. 1 ovsroot root 24800 Jul 23  2010 libgdbm.so.2.0.0
-bash-4.1$ ls -rlt /usr/lib/libdb.so.2
lrwxrwxrwx 1 ovsroot root 25 Apr 20 06:08 /usr/lib/libdb.so.2 -> /usr/lib/libgdbm.so.2.0.0
-bash-4.1$

3) Started Application tier services.

-bash-4.1$ cd $ADMIN_SCRIPTS_HOME
-bash-4.1$ ./adopmnctl.sh status apps/apps

You are running adopmnctl.sh version 120.4.12000000.3

Checking status of OPMN managed processes...

Processes in Instance: r12hyupg_hydhost02.hydhost02.example.com
-------------------+--------------------+---------+---------
ias-component      | process-type       |     pid | status
-------------------+--------------------+---------+---------
default_group      | oafm               |   14789 | Alive
default_group      | forms              |   14719 | Alive
default_group      | oacore             |   14634 | Alive
HTTP_Server        | HTTP_Server        |   14566 | Alive

adopmnctl.sh: exiting with status 0

adopmnctl.sh: check the logfile /u01/R12EBS/inst/apps/r12hyupg_hydhost02/logs/appl/admin/log/adopmnctl.txt for more information ...

-bash-4.1$
 

Hope this article will help you :-)

Tuesday, April 14, 2020

Query To Check Concurrent Program Run History in EBS

Following query will helps you to find the history of concurrent programs run in your EBS environment.

You should connect to 'apps' user for executing this query and query will prompt for "NO_OF_DAYS" and "USER_CONCURRENT_PROGRAM_NAME".

NO_OF_DAYS => "Enter Number of Days for History: ";
USER_CONCURRENT_PROGRAM_NAME => "Enter User Concurrent Program Name: ";

-- Query To Check Concurrent Program Run History    

set pages 100 linesize 200
col Parameters for a20 
col "Conc Program Name" for a30 
col "Started at" for a20
col "Completed at" for a20
col "Username" for a10 
SELECT distinct ft.user_concurrent_program_name "Conc Program Name",
fr.REQUEST_ID "Request ID",
to_char(fr.ACTUAL_START_DATE,'dd-MON-yy hh24:mi:ss') "Started at",
to_char(fr.ACTUAL_COMPLETION_DATE,'dd-MON-yy hh24:mi:ss') "Completed at",
decode(fr.PHASE_CODE,'C','Completed','I','Inactive','P','Pending','R','Running','NA') "Phasecode",
decode(fr.STATUS_CODE, 'A','Waiting', 'B','Resuming', 'C','Normal', 'D','Cancelled', 'E','Error', 'F','Scheduled', 'G','Warning', 'H','On Hold', 'I','Normal', 'M',
'No Manager', 'Q','Standby', 'R','Normal', 'S','Suspended', 'T','Terminating', 'U','Disabled', 'W','Paused', 'X','Terminated', 'Z','Waiting') "Status",fr.argument_text "Parameters",
fu.user_name "Username",
round(((nvl(fv.actual_completion_date,sysdate)-fv.actual_start_date)*24*60),2) "ElapsedTime(Mins)"
FROM
apps.fnd_concurrent_requests fr ,
apps.fnd_concurrent_programs fp ,
apps.fnd_concurrent_programs_tl ft,
apps.fnd_user fu, apps.fnd_conc_req_summary_v fv
WHERE 
fr.CONCURRENT_PROGRAM_ID = fp.CONCURRENT_PROGRAM_ID
AND fr.actual_start_date >= (sysdate - &NUMBER_OF_DAYS)
AND   fr.PROGRAM_APPLICATION_ID = fp.APPLICATION_ID
AND ft.concurrent_program_id=fr.concurrent_program_id
AND fr.REQUESTED_BY=fu.user_id
AND fv.request_id=fr.request_id
and ft.user_concurrent_program_name like '&USER_CONCURRENT_PROGRAM_NAME'
order by to_char(fr.ACTUAL_COMPLETION_DATE,'dd-MON-yy hh24:mi:ss') desc; 
 

Hope this query helps you. Thanks :-)

Some Most Popular Articles